The Handcrafted Resin Lamp Process – Behind an Artistic Light
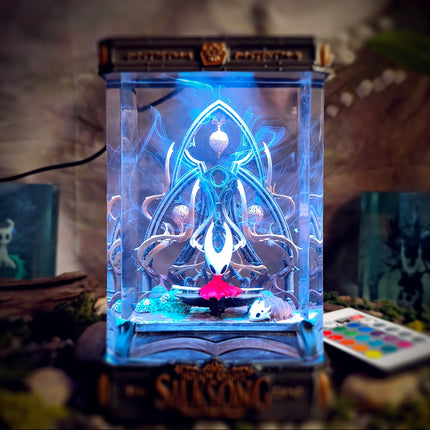
When looking at a finished resin lamp, most people immediately notice the glow, the depth, and the atmosphere it brings into a display space. What often remains unseen is the complex handcrafted journey behind it — a process where resin art, spatial design, and lighting quietly intersect.
This article explores how a handcrafted resin lamp is truly made, from the first idea to the moment it becomes part of a desk, shelf, or personal collection. The focus is not on technical jargon or exaggerated storytelling, but on understanding how an art resin lamp takes shape through careful decisions and skilled hands.
How Is a Resin Lamp Actually Created?
Unlike industrial decorative lights, a resin lamp is not the result of an automated production line. It sits between several disciplines, including resin art, miniature sculpting, 3D modeling, and lighting design. Each stage builds directly on the one before it, meaning a single misstep can affect the entire piece.
Because of this, resin lamps are typically handcrafted rather than mass-produced. Time, experience, and patience play a decisive role in determining whether a resin light feels shallow or visually immersive.
Step 1: Concept and 2D Design – Selecting a Moment
Every resin lamp begins with an idea, often inspired by anime, games, films, or symbolic scenes. The goal is never to recreate an entire story. Instead, artists focus on selecting one emotionally charged moment that can stand on its own.
At the 2D design stage, the overall composition is defined. This includes deciding where the main subject sits, how much space surrounds it, and what emotion the lamp should evoke when the light turns on. This step establishes the emotional core of the resin art lamp before any physical work begins.
Step 2: 3D Design – Shaping the Inner Space
Once the concept is clear, the idea moves into 3D design. This stage allows the artist to control proportions, depth, and perspective inside the resin block.
A resin lamp is not a flat object. It is a miniature environment designed to be viewed from multiple angles. The 3D model ensures that when light passes through the resin, the internal space remains readable and visually balanced rather than crowded or confusing.
Step 3: Mold Creation – Preparing for Epoxy Resin
After the 3D model is finalized, a silicone mold is created. Although rarely discussed by buyers, the mold has a significant impact on the final result.
A well-made mold preserves fine details, supports consistent resin flow, and helps maintain clarity once the epoxy resin cures. Poor mold quality often leads to surface flaws or loss of detail, which is why this step quietly defines the baseline quality of an epoxy resin lamp.
Step 4: Hand Painting – Giving the Piece Its Character
Before resin is introduced, the model is fully hand-painted. This stage is not simply decorative. Colors are carefully chosen based on how they will react under LED lighting.
If colors are too heavy, the resin space can feel dense and closed. If they are too light, the lamp may lack depth. Each layer of paint is applied with lighting behavior in mind, ensuring the final resin lamp retains its intended mood once illuminated.
Step 5: Scene Assembly – Balancing the Composition
The painted elements are then arranged inside the mold according to the planned composition. This is one of the most delicate stages of the process.
A small adjustment in position can completely change how the resin lamp feels over time. A successful composition remains engaging both up close and from a distance, preventing the piece from feeling visually tiring after long-term display.
Step 6: Pouring Epoxy Resin – Creating Depth
Pouring epoxy resin is often considered the most critical phase. Resin is added in layers to build depth, allowing artists to suspend elements at precise distances within the block.
At this stage, atmospheric effects such as mist or energy textures may be introduced. Controlling air bubbles, curing speed, and clarity requires experience, as even minor errors can compromise the entire epoxy resin lamp.
Step 7: Curing and Surface Finishing
Once poured, the resin must cure and stabilize over several days. After curing, the surface is manually sanded and polished.
This finishing process allows light to travel smoothly through the resin, creating the glass-like clarity associated with high-quality resin art lamps. Without proper finishing, even a well-designed lamp can appear dull or cloudy when lit.
Step 8: Base and LED Installation
A resin lamp becomes complete only when paired with its base and lighting system. Bases are often designed specifically for each piece to ensure balance and stability.
LED lighting is chosen not for brightness but for control. The goal is to activate the resin layers gently, turning the piece into a resin table lamp that enhances atmosphere rather than overpowering the space.
Step 9: Final Inspection and Completion
Before reaching the customer, each resin lamp undergoes a final inspection. Resin clarity, surface quality, lighting performance, and overall composition are carefully checked.
Because the process is fully handcrafted, no two resin lamps are exactly the same. Small variations are inevitable, and these differences contribute to the collectible nature of each piece.
Can You Make a Resin Lamp Yourself?
Search phrases like “how to make a resin lamp” and “epoxy resin for resin art” show that many people are curious about DIY resin projects. While basic resin art is accessible, producing a complete resin lamp with lasting display value is far more demanding.
Beyond technical handling of epoxy resin, a successful resin lamp relies heavily on spatial design and emotional balance. This is why many decor enthusiasts and collectors choose handcrafted resin lamps from specialized studios rather than attempting to make one themselves.
The Role of Modern Craft Studios
Modern craft studios play a crucial role in shaping the resin lamp landscape. Instead of focusing on volume, these studios emphasize thoughtful design, controlled resin clarity, and long-term visual presence.
Within this context, Lee-Area serves as a bridge between resin art and people who appreciate design, pop culture, and collectible display pieces. Resin lamps are treated not as standard lighting products, but as objects meant to live in personal spaces over time.
Understanding the Value of a Resin Lamp
A resin lamp is more than something you turn on for light. It represents time, intention, and craftsmanship layered into a single object.
By understanding how a resin lamp is made, its value becomes clearer. When placed into a living space, a resin light is not just decoration — it is a preserved moment of creative work, held still in resin.
Discover more about the world of Resin Lamps at Lee-Area: